
We prefer capturing our memorable moments as pictures or videos on several storage devices. But sometimes, these pictures became blurry or distorted depending on lighting, pixel movements, and other reasons. Luckily, there are some most commonly used workarounds that you can apply to fix blurry pictures. It is important to find the exact cause of your blurry pictures and then apply proper methods to fix them.
In this quick guide to fix blurry pictures easily, we will discuss a few methods to make your image perfect as it was earlier. Just go with the below methods to know how to fix blurry pictures and how to improve the clarity of your blurry images.
What Causes Blurry Images?
Before you learn how to fix blurry pictures, it is important to find the exact cause for your blurry images. There are several reasons why your images may occur blurred. Some of these are:
- Camera shake: The most common cause of your blurry pictures is camera shake or its sudden movement. Sometimes, your image-capturing device moves during the exposure, which results in a blurred image. This situation usually occurs if you’re holding the camera with a slow shutter speed or using a telephoto lens without placing it properly.
- Focus issues: Instances may occur when your camera fails to focus properly on the subject, which in result captures blurry images. Mainly, such issues occur due to misalignment of the autofocus system, wrong focus point selection, or shooting in low light as the camera cannot focus properly in such cases.
- Motion blur: There may be movement in the scene or the subject as well, this results in motion blurriness of the picture. If the shutter speed is not as required, it captures the blurred movement of the subject.
- Low light conditions: Exposure to proper lighting is very important when you capture any image. If you try capturing your images in low-light environments, the camera may use slower shutter speeds or higher ISO settings, which can introduce noise and blurriness into the image.
- Camera Settings: Your camera must have proper settings like adequate shutter speed, aperture, or ISO settings, otherwise it can result in blurry images. Make sure your camera settings are properly configured for the shooting conditions.
Quick Methods to Repair Your Blurry Pictures
Now that you are familiar with the causes of your blurry images, it’s time to learn how to fix or repair them. In this part of the blog, we will help you know how to fix blurry photos. Let’s start with the photo editor tools, such as Photoshop which can easily make your pictures less blurry by changing various image compositions. In some cases, Photoshop may fail to fix your blurry images, so you can use a professional image repair tool, such as Stellar Repair for Photo to fix them.
Method 01: Repair Blurry Images Using Photoshop
Photoshop is an all-in-one photo editing software program that provides advanced features for image manipulation. You can go through the following steps to reduce the blurriness of your image with Photoshop:
- Launch Photoshop on your device and then open the image that you need to repair. Go to the ‘Filter’
- Now, click on the “Sharpen” option from the filter menu, then select the ‘Shake Reduction Filter’.
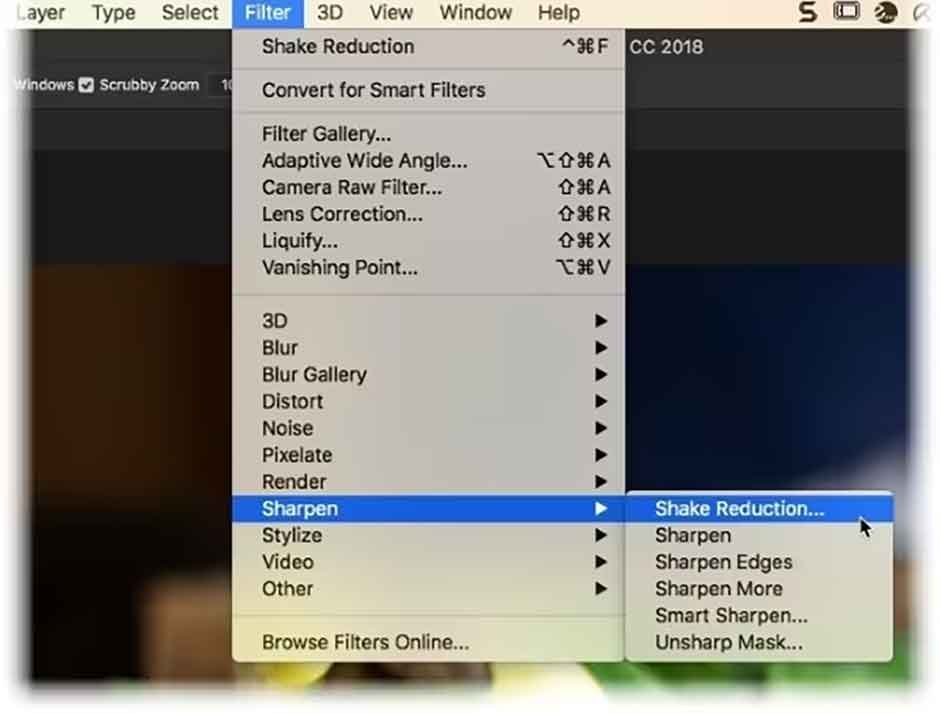
- Wait till the filter analyzes your distorted image. You can check the scanning status from the progress bar that appears on your screen.
Once the problem is resolved, Photoshop will display the enhanced image on your screen.
Method 02: Adjust Contrast and Brightness
You can adjust the contrast and brightness of your image to make it better. Increasing the contrast can make your picture more defined while adjusting brightness can enhance its overall visibility. All you have to do is:
- Open image editing software, such as Adobe Photoshop. Click the “Open” or “Import” option and select the desired image that you need to repair.
- Locate and click on the “Brightness” or “Exposure” or “Tone” feature and adjust the brightness slider or manually input the values to increase or decrease the brightness.
- Similarly, locate the “Contrast”or “Tone Curve” option and increase the contrast to make your image less blurry.
After executing the changes successfully, preview the image and save the edited image as a new file.
Method 03: Use Photo Repair Tool to Fix Blurry Images
If the above methods anyhow fail to repair your blurred photos, you can try using a photo repair tool. Among several such image-repairing tools, we recommend to use Stellar Repair for Photo. It is very easy to use and can repair your damaged or corrupted images in a few simple clicks.
Given below are some main features of the Stellar Repair for Photo tool that makes it best to fix your blurry images:
- Repair pictures with all levels of corruption, like dark photos, grainy photos, faded photos, etc.
- It supports the repairing of multiple corrupt files simultaneously.
- Not only JPEG/JPG files, but this tool can also repair images of several other formats, such as PNG, NEF, NRW, etc. It can even repair all popular RAW image formats.
- Allow you to preview the recoverable files before saving them on your device.
- The software is 100% safe and secure to download as it is free from any virus, malware or Trojan.
Now check the step-by-step process on how to fix blurry photos using this amazing tool:
- Initially, you need to download and install the Stellar Repair for Photo tool on your device.
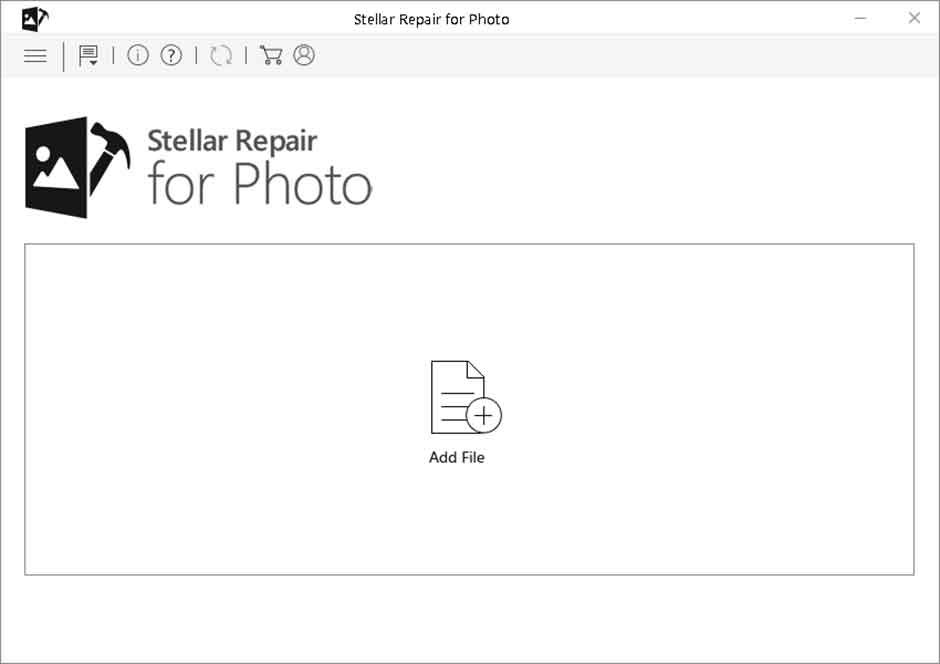
- Now, launch the software and from the homepage, click Add File button to select the file you need to repair.
- After you load the images that you want to repair, wait till the scanning process gets completed. This might take a few minutes depending on the file size.

- When the scanning process gets completed, preview the repaired photos and click Save Repaired Filesto save them at the desired location.

Tips to Avoid Photos from Getting Blurred
Though the above methods to repair your blurry images are easy to implement, it is important to know some tips that you can follow to avoid such issues while taking pictures. For this:
- Carefully hold your camera or smartphone while capturing pictures as any movement can make your image more distorted.
- Ensure that your subject is in focus before capturing the shot. You can use Autofocus or manually adjust the focus to ensure the sharpness of your images.
- Make sure your images are captured in adequate-light situations. Also, a high shutter speed is required to capture sharp pictures.
- You must have a good-quality lens to capture a good image. Make sure your lens is clean before taking the picture.
Wrapping Up
By implementing the above tools and techniques, you can easily capture images of high quality. Just go with the aforementioned methods to know how to fix blurry pictures easily. Also, consider the tips mentioned in this article to get rid of blurry pictures on your device. Using a professional image repair tool, such as Stellar Repair for Photo is the best option to repair your images that are damaged due to any reason.