Over time, the exposed end grains of outdoor deck boards can become quite rough. Many will crack and split, while others will cup.
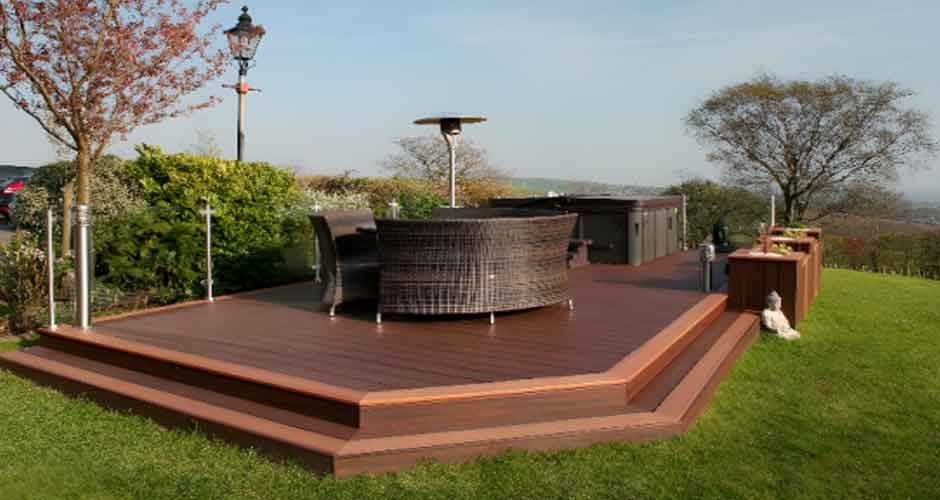
Installing a trim board around the edge of the composite decking is an effective way to finish the surface. This method is also known as deck picture framing or racetrack decking.
Where the picture frame planks will run parallel to the joists, blocking must be inserted between them. Short deck boards may be necessary depending on the style of the deck picture framing. There are a few basic installation techniques to bear in mind when installing them.
How to Construct a Picture Frame Deck
Step 1: Install Decking Border Support
Install blocking at least 16″ on center along the sides of the deck, 1-1/2″ below the top of the frame. You might be able to block with leftover material.
Step 2: Get the Picture Frame Ready for the Border
Install 2×4 material around the deck’s perimeter as a fastening surface for the picture frame decking and to end fasten the field decking boards.
Step 3: Apply the border to an angled corner.
Place the photo frame border with the required overhang in place. It is 2-1/4″ in this example due to the skirting and fascia boards that will be laid outside the frame below.
Step 4: Allow for the installation of rail posts.
Around rail posts, notch the picture frame border. Allow for thermal expansion by leaving a 1/8″ – 1/4″ gap for a picture frame with composite decking. Picture frame decking made of wood can be notched flush with the post.
Step 5: Continue the frame along the house’s exterior wall.
You can extend the picture frame decking along the house wall if you want. Take note of the 45° miter cut in the corner. In this example, we had to cut the last two deck boards in the field to prevent the last board from being only 3/4″ wide.
How Do You Secure the Edge of a Picture Frame?
In general, no composite board should be supported by fewer than three joists beneath it. Additional support should be put between the regular spacing when short pieces are required to finish the deck picture frame. It is also critical to reduce the contact area between the decking and the support.
Picture framing a deck necessitates close attention to detail to ensure that the picture frame boards are in the same plane as the main decking boards. Because the outer rim joists are not flat with the joists or the blocking in parallel joists is not flush with the top of the other joists, the deck picture frame boards cannot be tilted one way or the other. When considering how to picture frame a deck, this is an issue that is sometimes disregarded.
It is simple to secure the picture frame boards. Typically, the outer board must be facing attached. Refer to the installation instructions for the appropriate screws, spacing, and plugs to conceal these screws.
Face-fastened decking necessitates screws that penetrate the board’s face. High-quality composite decking frequently includes unique screws with plugs created from the decking itself. When you use a specific driver to countersink the screws, the head of the screw is approximately 14 inch below the surface, allowing the plug to be tapped into place and the screw to be hidden.
What is the ideal amount of overhang for a picture frame deck?
Some deck builders install the trim board approximately an inch above the rim joist edge in order to tuck the fascia board underneath. This permits water to drain off the edge of the board. This minor detail can significantly improve the overall presentation of your deck.
Additional Considerations for Picture Frame Decking Installation
Consider how your rail system will be attached, as well as how your rail posts will intersect with the surrounding decking.
In truth, the picture-frame border is no more difficult to install than standard decking planks. It is critical that you take the time to ensure that the picture frame boards that run parallel to the main decking boards are straight. People will notice if the decking spacing is inconsistent when the main decking planks are built off the picture frame.
The tools required to install a picture frame are the same as those used to secure the other decking boards. You’ll need a quality miter-box saw to cut clean miter joists for the picture frame corners. A drill, a drill/driver, a jigsaw, a tape measure, and some rope are required. Make sure to view any installation videos given by the decking manufacturer. These tools will assist you in avoiding costly blunders.
Begin planning your deck today
When building your deck, you should definitely consider a picture frame deck pattern. The picture-frame effect adds intrigue, especially if the frame is made of different colored decking material. While installing the blocking for the picture frame requires a little more effort, the attention you’ll receive from your friends and neighbors will be well worth it.
Are you ready to begin assembling your photo frame collection? Find a local retailer or contractor to assist you in building your deck.